Oral Motor Exercises Parents Can Try at Home to Improve Speech Clarity in Down Syndrome


As a parent, you want to do everything possible to support your child's communication development. The good news? You can make a real difference between therapy sessions with simple, guided practice at home.
Oral motor exercises use specialised tools to strengthen the muscles needed for clear speech. When done consistently and under your therapist's guidance, these activities help reinforce what your child learns in sessions - building speech clarity one small step at a time.
This guide shares practical exercises you can try at home to support your child's Down Syndrome speech development.
Key Takeaways
- Home practice reinforces skills learned during therapy sessions
- Oral motor exercises target jaw stability, lip closure, and tongue movement
- Simple oral motor tools make practice engaging and effective
- Consistency matters more than duration — short daily sessions work best
- Always follow your therapist's guidance for your child's specific needs
Why Home Speech Therapy Practice Matters for Down Syndrome
Children with Down Syndrome often need extra repetition to build strong oral motor skills. Weekly therapy sessions provide expert guidance, but daily home practice is where real progress happens.
Think of it like learning to play an instrument. A weekly lesson teaches technique, but daily practice builds muscle memory. The same applies to speech development.
Research published in the Journal of Speech, Language, and Hearing Research shows that frequent, short practice sessions lead to better outcomes than occasional longer ones. Even five minutes daily can make a meaningful difference in your child's speech clarity.
Your role isn't to replace your therapist — it's to create opportunities for your child to practise in a relaxed, familiar environment. These home speech therapy tips will help you do exactly that.
Understanding the Oral Motor Tools Used in These Exercises

Oral motor exercises use specific tools designed to target the muscles involved in speech. Each tool serves a purpose, helping children feel and understand how their mouth should move.
Common tools include:
|
Tool |
What It Targets |
|
Jaw strength and stability |
|
|
Lip rounding, lip closure and tongue retraction |
|
|
Tongue retraction and lip rounding |
6 Oral Motor Exercises to Support Down Syndrome Speech Development
Below are six exercises you can try at home to support your child's oral motor development. Whether your clinician has recommended specific oral motor exercises or you are looking to complement ongoing therapy, these activities provide a practical starting point. Always practise as prescribed by your clinician before starting any new activities.
Exercise 1: Chewy Tube for Jaw Strength
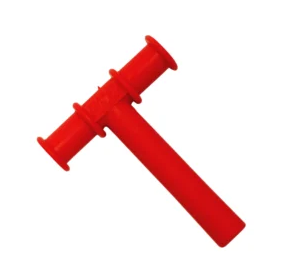
Purpose: Build jaw stability, strength and grading, which forms the foundation for clear speech.
How to do it:
- Place the Chewy Tube on your child's back molars (one side at a time)
- Encourage gentle biting and releasing
Frequency: As prescribed by your clinician, typically once or twice daily for a few minutes.
Safety note: Always supervise this activity. Stop if your child shows signs of discomfort.
Exercise 2: Straw Drinking for Tongue Retraction
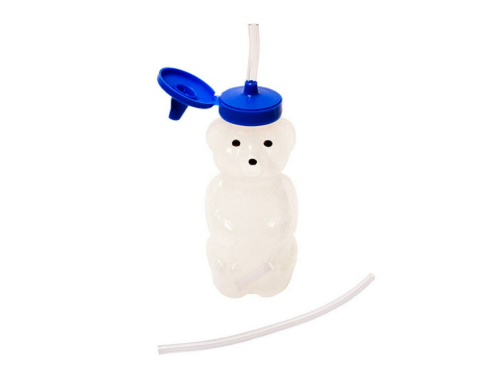
Purpose: Encourage straw drinking using lip closure and tongue retraction
How to do it:
- Fill with a preferred drink (thicker liquids such as barley water work well initially, as their slower flow rate allows for better oral control and safer sipping).
- Encourage your child to drink using lip closure, without biting on the straw.
- Gently squeeze the Honey Bear to help draw the liquid up.
Frequency: During snack times or meals, as guided by your clinician.
Exercise 3: Horn Blowing for Lip Closure

Purpose: Strengthens lip muscles and builds breath support for speech.
How to do it
- Start with Horn 1 (the easiest level) or as prescribed by your clinician
- Demonstrate blowing through the horn, keeping lips sealed around the mouthpiece.
- Encourage your child to use their lips, not their teeth
- Aim for a few blows per session
Progression: Once your child masters one horn, your clinician will guide you to the next level.
Frequency: As prescribed by your clinician.
Safety note: Never force your child to continue if they become frustrated. Keep it playful.
Exercise 4: Bubble Blowing for Breath Control, abdominal grading and Lip Rounding

Purpose: Develop sustained airflow and lip rounding.
How to do it:
- Use a bubble wand and solution
- Pop the bubble on your child’s lips to create awareness.
- Catch a bubble on the wand and let your child breathe on it, watching the bubble move.
- Encourage your child to blow gently with rounded lips.
Try a few rounds per session, as guided by your clinician
Safety note: Use non-toxic bubble solution and supervise to prevent spills.
Exercise 5: Spoon Feeding for Upper Lip Activation

How to do it:
- During mealtimes, present food on a flat shallow spoon
- Place the spoon on your child's lower lip.
- Wait for your child to close their lips over the spoon using their upper lip. Provide lip support.
- Praise their effort each time
Frequency: During meals, as guided by your clinician.
Safety note: This skill takes time and patience. Follow your clinician's guidance on readiness and progression.
Exercise 6: Mirror Play for Speech and Oral Awareness

Why this works
Children learn a lot by watching and copying others. Mirror play is a simple but powerful speech therapy activity for toddlers and young children. When your child watches your mouth and tries to imitate it, their brain is building connections between what they see and how to move their lips and tongue.
This process, linked to the brain’s mirror neuron system, supports speech development, oral motor skills, and early sound production, especially for children with speech delay or delayed imitation skills.
How to do it:
- Sit together in front of a mirror
- Encourage your child to copy you
- Turn it into a game by taking turns leading
- Make exaggerated mouth movements such as:
* Wide smile for “ee” – helps with lip retraction and clarity of vowel sounds
* Lip rounding for “oo” – supports sounds like ‘oo’, ‘w’, ‘sh’, ch’ needed for speech sound production
* Tongue clicks – builds tongue tip elevation, strength, and control for clearer speech
* “kkk” sound (gargling back-of-throat sound) – encourages back tongue elevation for /k/ and /g/ sounds
Why this helps:
These simple oral motor exercises support speech development, oral motor skills, and early sound production, especially for children with speech delay or difficulties with sound imitation.
No tools needed: Just a mirror and some playful energy.
Safety note: Keep it light and fun. If your child loses interest, try again another time.
Home Speech Therapy Tips for Successful Practice Sessions
Making home practice work requires more than knowing the oral motor exercises for kids. Here are some home speech therapy tips to help you succeed:
- Keep sessions short: A few minutes is plenty. Young children have limited attention spans.
- Choose consistent times: Build practice into your daily routine, such as after breakfast or before bath time.
- Follow your child's lead: If they are tired or unwell, skip the session. Forcing practice creates negative associations.
- Make it playful: Games, songs, and silly faces make exercises feel less like work.
- Track progress: Note what works and share observations with your clinician.
- Always follow clinician guidance: Frequency, tools, and progression for all TalkTools exercises should be prescribed and reviewed by your clinician regularly.
Remember, small consistent efforts add up. You do not need to be perfect — you just need to be present.
When to Consult Your Speech Therapist About Oral Motor Exercises
While home practice is valuable, clinician guidance ensures your child's safety and progress. Reach out to your therapist if:
- Your child consistently resists certain exercises
- You notice pain, gagging, or discomfort during activities
- You are unsure whether your child is ready to progress to a new tool
- You want additional oral motor tools to try at home
Your therapist can adjust the programme, suggest alternatives, and ensure exercises match your child's current abilities. This partnership between home and clinic creates the best outcomes for Down Syndrome speech development.
Explore more resources on our blog for additional guidance on supporting your child's communication journey.
Frequently Asked Questions About Oral Motor Exercises at Home
How often should we practise oral motor exercises at home?
Short daily sessions work best. Consistency matters more than duration — regular practice reinforces muscle memory and builds skills faster than occasional longer sessions. Always follow the frequency prescribed by your clinician, as this will be tailored to your child's specific needs and current stage.
Can I start these exercises without seeing a therapist first?
We recommend working with a clinician before beginning any oral motor exercises at home. They will assess your child's specific needs and prescribe appropriate exercises, tools, and frequency. This ensures all activities are safe and effective for your child's current stage of development.
What if my child resists using oral motor tools?
Resistance is normal, especially at first. Try making activities playful — turn horn blowing into a game or let your child explore tools at their own pace. If resistance continues, speak with your clinician about alternative approaches that might suit your child better. Never force any oral motor exercise.
Support Your Child's Speech Journey
Every moment you spend practising with your child matters. These small, consistent efforts — always guided by your clinician — build the foundation for clearer communication and greater confidence.
Explore our oral placement therapy tools to find resources that support your home practice, or visit our website to learn more about how we can help your child's speech development.